Acrylic paints are thus far my preferred medium to paint with (though I’ve been playing with watercolours recently too). Probably their most distinctive feature – both blessing and curse – is their rapid drying time. The moment it leaves the tube, acrylics undergo a chemical reaction with the air and begin to set. Having three young children means that my palette is often left unattended and I would waste a lot of paint were it not for these tricks of the trade.
Throughout the day, whenever I get a few moments, I can pick up a brush, uncover my palette and pick up exactly where I left off without having to remix dried colours or try to refresh semi-dried paint.
Adding Water
This is an obvious one. Acrylics are water soluble and can therefore be thinned by adding water. However on a cellular level, this isn’t necessarily the best choice. The long story: all paint is made of 2 basic components: pigment (for color) and binder (to make the pigment usable as a paint). The binder identifies the paint. For instance, take some pigment and add oil – now you have oil paint. That same pigment
- mixed with milk makes casein,
- mixed with gum Arabic makes watercolour
- mixed with polymer (or plastic or acrylic) makes acrylic paint.
So there’s pigment and binder…. and then there’s the solvent. Each medium has a solvent that will break it down. For acrylic the solvent is water. Adding water means you’re thinning the film of dried acrylic paint and jeopardising the longevity of your finished painting – maybe not in your lifetime, but it has been thinned and weakened.
Having said that, adding a little water (no more than 20%) is okay. Just add it in a controlled way – blot your brush after rinsing it and think carefully before spraying it all over your palette or canvas.
Adding A Retarder
I pay about $12 for a bottle of Jo Sonja’s Retarder. I’m not a great fan of retarder. I do use to for certain things but occasionally and sparingly.
Adding a few drops to a small puddle of paint on your palette will slow the drying time considerably…but it also changes the way the paint flows across the board. It can leave the paint feeling sticky and the dried paint may have a glossy result (which isn’t really a problem if you plan on sealing with a gloss). Adding too much will lift the paint from the canvas or expose the colours underneath.
Bristles strokes are non existent with this method as the pigment spreads across the wet area – similar to watercolours. I most often use it to blend highlights or shadows to area’s for this reason. It’s great for painting subjects that have smooth shiny surfaces and the skin of portraits – not so good for rocky areas and textured surfaces. After laying down a base coat of colour, letting it dry and then painting the retarder on top of that base coat, I can come along and blend the new colours or tones over it sparingly.
Retarders are great for working wet-on-wet. There’s a few ways to apply it:
- add it directly to the paint on your palette,
- side load your brush (dip your brush in the retarder and then pick up some colour)
- apply it directly to the canvas and paint over the top of it (wet on wet)
- add a little to a small spray bottle of water and mist your canvas all over before you start (just enough to break the surface and allow smooth brush strokes.
I love it in small doses, I just don’t love it as much as other acrylic artists. It’s best to experiment with the amount of retarder you use but I suggest using less of it than you think you’ll need – you can always add a little more later if it’s needed. If you apply it to the canvas, you can use a paper towel to lift a little excess off, but if you overdose the paint on your palette it will be a long wait before you can use it again.
Stay Wet Palette
This trick is the best thing that ever happened to me as an acrylic artist! The stay wet palette means that I can mix up an entire range of skin tones and pick away at a portrait over days without having to remix colours or rush my work.
You can buy them online or from some art supply stores… I think you should save you’re money.
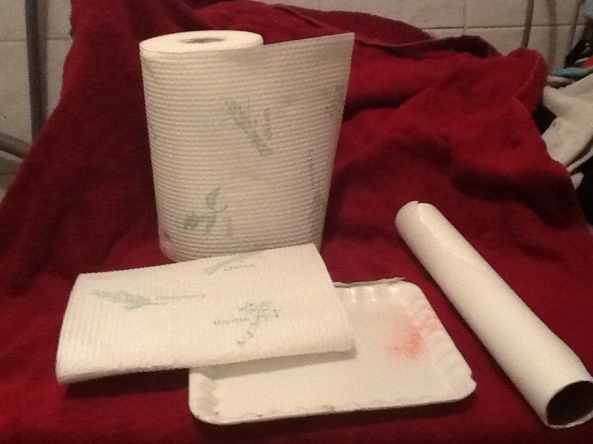
You’ll need a tray of any kind, some water, a few paper towels and some baking paper.
I use a polystyrene tray to make my own – I’ve also been known to use disposable plastic plates, the lids from large tupperware containers and just about anything else that has a flat surface & a slight lip around the edges to hold the water in.
I use a few paper towels to hold the water in my stay wet palette and baking paper is the top layer.
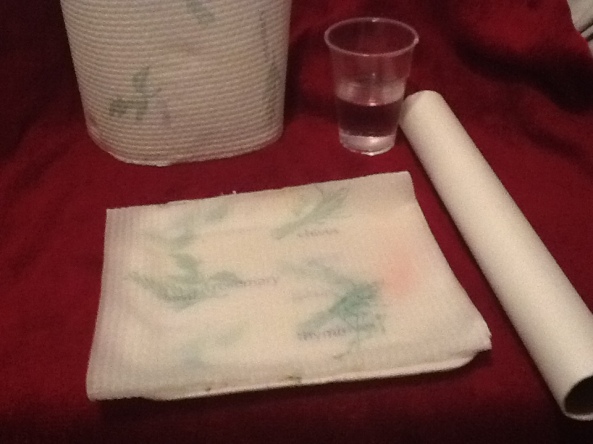
Fold a few layers of paper towel to size and add them to your tray. Pour a little water onto the paper towels and drain off the excess.
Fold up a few layers of paper towels and pour some water into the tray – I’ve used about half a glass to soak five paper towels and then drained off the excess water.

Add a top layer of baking paper (trim away the excess) and apply your puddles of paint directly on top of the baking paper.
The top layer is baking paper – not to be confused with greaseproof paper. I’ve tried a few different brands of baking paper and some are more absorbent than others. The paint goes straight on top of the baking paper and from time to time, I’ll peel back a corner to check that the paper towels are still moist and top it up with water as required.
As long as there is enough water underneath, the paint will absorb the water up through the baking paper. You can also use a spray bottle to occasionally mist the top of the paint if you live in a hot dry climate like I have here in Australia. If you cover the top of the palette when you’re not using it, you’ll also keep your acrylics fresher for longer.
When you’re mixing colours on the palette just keep in mind that you’re mixing up on paper, not a plastic or wooden palette. You’ll need a delicate touch. The more water underneath, the more likely the baking paper will tear – carefully scrape the paint to a better area if this happens.
I think the longest I’ve kept my paints moist with this method was three days – like I said, there’s chemical changes going on when paint & air collide. You’ll notice the texture of the paint thicken when this happens – sometimes (if it’s not too dry) it can be refreshed with some retarder or water but again, you’ll be compromising the longevity of your painting. Best let it go & start with fresh paint when that happens.
MIXING COLOURS: Another great tip I picked up when I started painting was to make notes (and colour swatches) of my colour mixes.
Eg: 1 part cerulean blue, four parts white and a “touch” (a match head sized drop of paint) of sap green = ??? Make a sample of the resulting colour on a piece of card or paper. Eventually you’ll have a little library of colour swatches to reference and if your paint does dry out, you’ll know exactly what colours you’ll need to remix your palette.
By creating these swatches, you’ll quickly learn the basics of colour mixing because it forces you to pay more attention to what colours and how much of them you use to create a pleasant shade or hue. Colours vary from one brand to another so this is also a great way to learn your brand and understand how different colours react together.
It’s like when you’re a passenger in a car, you don’t pay attention to the route but once you’re driving the car you have to memorise the landmarks and street names. These colour swatches will serve as a road map until you finally memorise the route.
I always start my colour mixes with a tube colour that it most similar to the colour I’m looking at and then add other colours to tint or tone. For example, if I need a pale sky blue, I’ll start with white and slowly add blues. Starting with blue and then adding white can become wasteful as you find yourself having to add more and more white paint until you finally get the right shade.
That’s it. Those are my most valuable tricks of the trade, the ones that have served me best. Feel free to let me know how you go.
Happy painting everyone.


